It’s Release Day!
It’s time for another AcuGraph 5 release! There are some really exciting changes in this release (including the awesome new custom treatments feature) and it’s all thanks to you, the practitioners we serve.

We would be remiss to show you one of our favorite new features–custom treatments–without first saying thank you. Thank you for honoring us with your business, and thank you for your feedback and suggestions. We truly strive to constantly improve ourselves and our products to better fill your needs.
So, with that, we’re excited to announce a new version of AcuGraph, and its new custom treatments feature.
To learn more about the other features included in this AcuGraph release, you can read a summary here.
Have you Updated?
To update your AcuGraph 5 software to the latest version to access these new features, open your AcuGraph 5 software, and you should automatically be prompted to update the latest version of AcuGraph 5. If no prompt appears, click on the ‘Help’ button at the top of your screen, and select ‘Check for Update’. Go through the installation process, and you’ll be ready to start using these new features!
Watch the video below and follow along in this post to learn about custom treatment recommendations!
Custom Treatments – Watch and Learn!
Categories
To start, click on the ‘Reference‘ section (the icon looks like a little book.) Next, click on the ‘Custom Tx‘ tab. Here, you can set up custom treatments that AcuGraph will recommend in future sessions, based on the parameters you set up (we’ll show you how!)

You can use categories in any way you want–for any special treatments that you often use. You could create a nutritional category, or a massage category; a category for homeopathic remedies, herbs, essentials oils, home care, exercise, etc. The options are endless! This feature was designed specifically to help you tailor your treatment recommendations to your unique style and skillset.
First, click on ‘Add New‘ and then choose ‘Category.’ Then, give the category a name. Now, you can begin adding items to your category.
Recommendations
Within your newly created category, you can now create a recommendation. For instance, using our example from the video above, if your category was “Essential Oils,” a recommendation might be “Peppermint Oil.”
After you’ve created your first recommendation, if you look slightly to the right, you should see three horizontal bars: ‘Type,’ ‘Title,’ and ‘Category.’

Continuing with our example, the title would be ‘Peppermint Oil,’ the category would be ‘Essential Oils’ and the type should say ‘Graph Dependent.’
Setting Graph Parameters
Graph Dependent means that the peppermint oil recommendation will be made only if the patients graph fits a certain set of parameters, which you set.
Just below the category bar, you should see the ‘Conditions‘ section, which has boxes you can check for different conditions within the meridians. In this example, we’ll check GB excess and GB split. Now, if either one of those conditions is present on the patient’s graph, the peppermint oil recommendation will become applicable.
After you’ve ticked the appropriate condition boxes, now you can add some text in the ‘Description‘ field that explains the custom recommendation. This text will be shown when you choose to include this recommendation in future treatment plans.
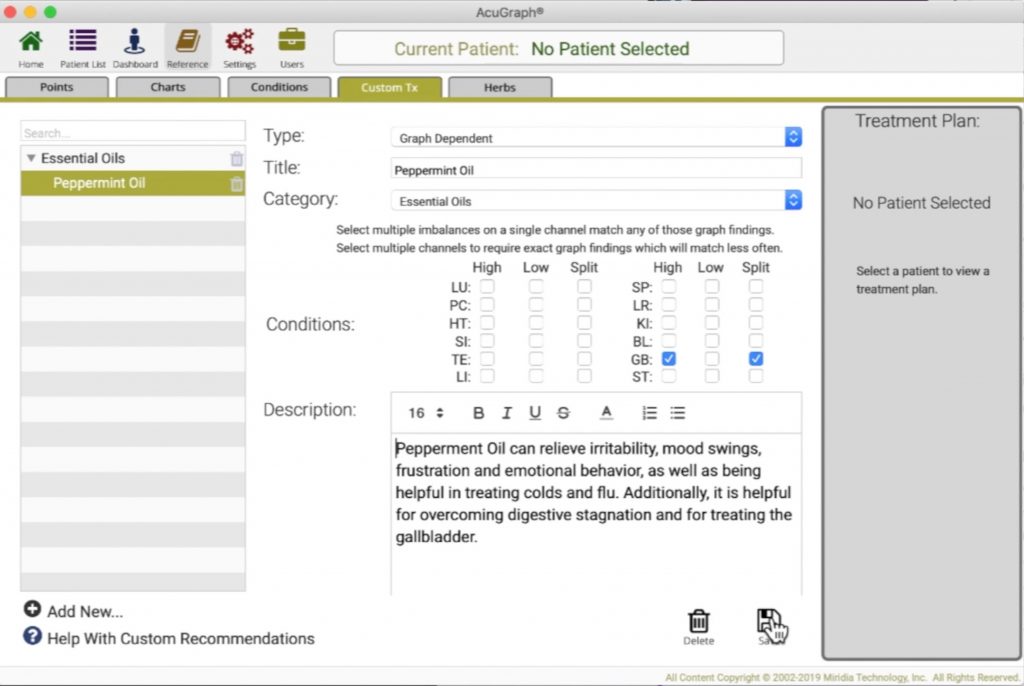
Once you’ve selected the type, title and category for your recommendation and given it a set of conditions and a description, you’re ready to save it. Hit the small ‘save’ icon in the bottom right corner of the screen.
You can repeat this process to add as many categories and subsequent recommendations as you see fit; just make sure to hit save when you finish each one.
General Recommendations
If you create a recommendation that is in the general type rather than graph dependent, you simply won’t need to select any of the graph conditions. These recommendations will always show up in the ‘Custom’ tab, and you can choose to select them, or not to select them, based on your diagnosis.
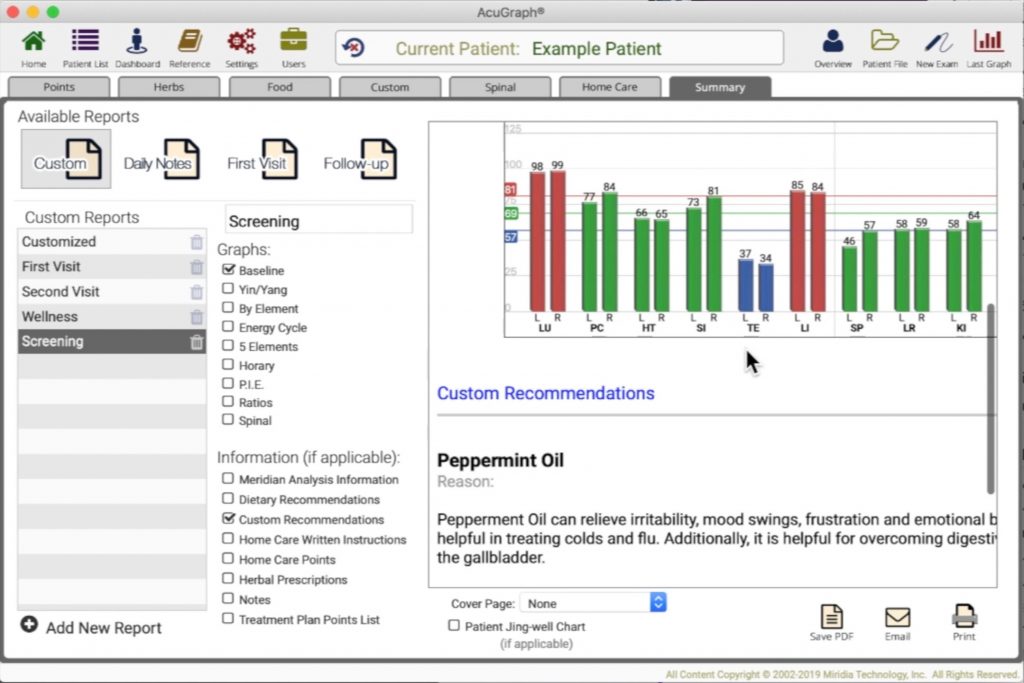
Once you’re satisfied with your new categories and recommendations, you can test them out by pulling up the records of an existing or example patient, or graph a new patient. From there, go the ‘Custom’ recommendations tab. Listed below the graph, you should see all of your general recommendations, and all of the graph dependent recommendations that fit the graph in question. You can tell the graph dependent suggestions apart because of the little graph icons display next to them. You can select as many recommendations as you see fit–or none at all.
Patient Report
Finally, you can view the patient’s report within the ‘Summary‘ tab. Check the ‘Custom Recommendations’ box and scroll down. The custom recommendations that you chose will be included right there in the take-home report.
If you take the time to build out a library of custom recommendations that fit your practice and treatment techniques, you will find it simple and easy to add custom treatments to patients’ plans with just a couple of clicks of your mouse. We hope that this exciting new feature helps tailor AcuGraph’s software to your unique practice needs, and adds value to your practice.
Download the Latest Version of AcuGraph 5
As ever, these updates and improvements are driven by requests, feedback and suggestions from you —our users. If there’s something that you’d like to see in a future version of AcuGraph, reach out and let us know! We are constantly striving to make our products better for you.
To get started with these, and other new features, you’ll need to download the latest version of AcuGraph 5, Version 5.3.0.10!
To check what version of AcuGraph you’re running, and to download the latest version, follow these instructions:
- Open the AcuGraph software
- If your software is NOT up to date, AcuGraph SHOULD prompt you to update to the latest version in a pop-up window. Don’t close out of this window!
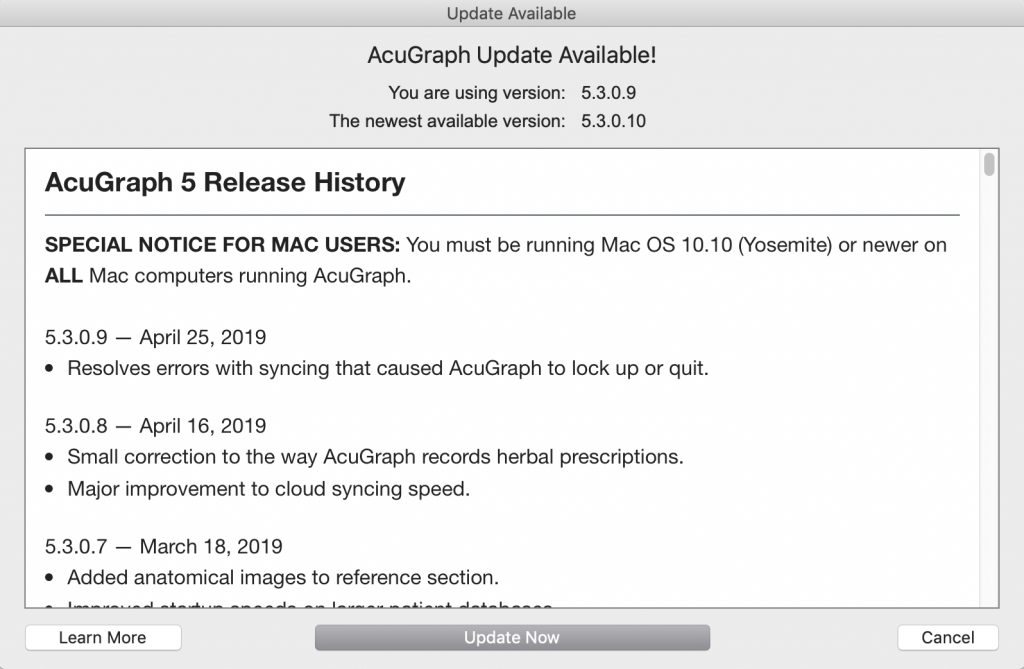
- Click the ‘Update Now’ button and finish the installation.
- Once the installation has finished, re-open the AcuGraph software.
- Under the ‘Help’ menu on the top menu bar of your screen, click on ‘Check for Update’. If you are running the latest version of the software, AcuGraph will tell you. If you need to update your software, AcuGraph will tell you as well.
For AcuGraph to run most effectively, it needs to be running the latest version. Make it a part of your workflow to check for updates about every 3 months to make sure you’re always running the latest version!
If AcuGraph doesn’t prompt you to update your software when you launch the application, you can always go to www.Acugraph.com/start to download the latest version.
If you need help updating or installing AcuGraph, you can set up an appointment with our tech support staff at www.AcuGraph.com/schedule.
Still have AcuGraph 2, 3 or 4?
If you’re still using a very old version of AcuGraph, you can upgrade to AcuGraph 5, and get continuous updates, as well as access to these eight new features, and many, many others.
Click here for information about upgrading to AcuGraph 5 >>
We’ll keep the improvements coming. Let us know if you have questions, comments or concerns! Thank you for being part of AcuGraph.
Sincerely,
Dr. Adrian Larsen

2 Replies to “New AcuGraph 5 Feature: Custom Treatments”